Sunday, May 27, 2012

My Lemon Tulip Skirt Only Needs A Button Or Two Now

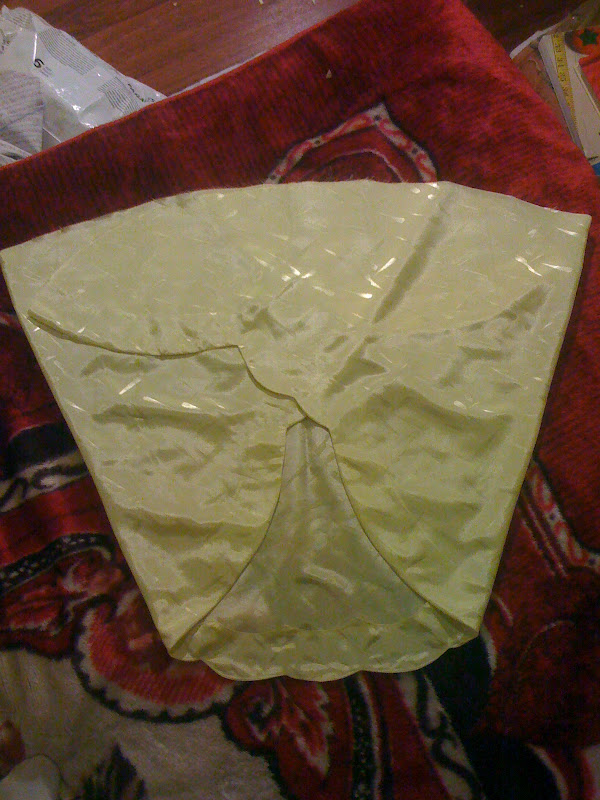
I just managed to finish my lemon tulip skirt portion of my portfolio piece today,  I had to blind slip stitch the waistband to the wrong side of the skirt and then tack the hen facing to the inside of the skirt edge with the same blind slip stitch.  I have to say,  after seeing how it looks,  I think I change my mind about wanting a fine hand rolled hem instead.  I really like the way this turned out.  Take a look below...


my patternmaking and design portfolio piece

my patternmaking and design portfolio piece

I love the way it curves gently outward from the waist then tapers to a narrow opening at the hemline...just like a tulip.  So lovely.  Now,  I remember hearing on Fashion File,  years ago,  they were talking about one of John Galliano Couture collections for Dior had such fine craftsmanship,  but that it was done with such a fine hand "...the clothes didn't look beat up".  I was afraid that once I tacked down the facing to the inside of the skirt that it be weighted down and look overworked instead of looking like...a tulip,  but it turned out great.   Thank God.

 I just have decide on what kind of closure type I'm going to use.  In a Threads Magazine article,  I read that any kind of closure on lingerie should act as additional embellishment and treated like jewelry.   Okay,  I've got to look for the right buttons then and make sure I've got 4 altogether,  two for the skirt and two for the bodice piece.

When I'm finished with this portfolio piece though,  I mean the entire look,  not just this skirt,  I'm going to put up another Patternmaking ad and include my portfolio link,  I think I'll redo the url for that thing too,  it's not great for Google pick up with the words it's using now.   I think I'm going to offer my old deal again too,  4 patterns at $35 EUR each get the 5th one free.

On another note now though,  I've put together a Pinterest board in dedication to my mom who has passed away.   I haven't been able to think about much else lately,  it troubles me that not enough people got to know just how wonderful and loving my mom was.  She had an extremely well rounded range of interests and concerns for many things,  the kind of things that mattered.   I miss her very much and wanted to share what I could about her character.  Here is the link to the Pinterest I made for her:   http://pinterest.com/ayisha1978/all-about-mom/ and the photo of her that I'm going to use as the cover.


If you'd like to read more about fashion, information on the industry and online schools check out my site at:

If you're a designer or home sewer and you'd like to find some cool eco-friendly fabrics and more check out my resource page at:


Saturday, May 19, 2012

Patternmaking And Pattern Alteration On My Design


I sewed the scalloped neckline facing onto the bodice yesterday.  To all us sewing moms out there, who haven't done this sort of thing yet,  don't do it with a wiggly baby in your lap, it's not going to turn out the way you want it.  Big No No.  However,  here are a few "to do" notes, sew sharp curves very slowly,  think of machine stitching as taking one stitch at a time,  one stitch at a time,  stop and go,  stop and go.

The result will be a smoother stitching line,  greater symmetry.  I also lightly marked my stitching line this time to 'see' better what I was doing (See Below).  I also loosened up the pressure foot tension on my Singer sewing machine,  just wish it could have been lightened up even more,  as the fabric still wasn't as free to move as I would have liked (my make of machine only goes so far though).


I was thinking though,  this type of sewing is why it would be great to actually have a manual sewing machine still.

Once I did the fitting,  I realized it had too much ease,  here a few pictures to show it...

eeek!  too much ease in the pattern
I would need to distribute the ease take up evenly between the side seams,  front and back darts as well as between the bustline and midriff level so as not to through the pattern off balance.  So I took

3/8" from the side seams and 1/8" from each dart which is actually a total of 1" and 3/4" ease take up.  I'll have to take the changes to the midriff band as well.

Here are the results after I made the necessary pattern alterations...

pattern alterations made,  much better fit
Will have to adjust the armscye curves too... what to do about the bias cut sleeve pattern?   I didn't want to have a seam,  but I'll create 3/8" underarm seam without cutting it open.  I'll just clip it at the soft foldline and turn it inside out (as the  bias cut tulip sleeve was cut on a fold to prevent it from having a completely sewn sleeve hem).

If I had the money,  I would have made a muslin out of some organic cotton or something,  like I was supposed to,  totally you know?  But,  I didn't,  and I would also buy some additional fabric to make a new version because this light weight yellow damask fabric is so delicate.

I need proper pressing equipment too!

I was looking at a Calvin Klein collection afterwards though from back in 1991,  that was a good year,  miss those days, Check it out here from Fashion Channel on YouTube:


...and it had me thinking.   I may choose a simpler,  clean,  fitted cut for my next portfolio garment design.   After all is said and done, if a 'promotional' project is to ambitious before it has the proper backing (in either knowledge,  skill or finances) it can do more damage in a way, then the good. it will do.  But only in a way.

I've learned a lot though,  still on,  and it felt good to finally produce something from a pattern I drafted on the computer.  In the end,  it wasn't actually my computer drafting that was even the problem.  Everything was fine there,  I just didn't know how to draft that kind of pattern correctly (cropped midriff lingerie style garment)  and which finishing elements would work best for that kind of design.  That's why I'm going to be buying that lingerie book though, "Pattern Cutting for Lingerie, Beachwear and Leisurewear" by Ann Haggar.  I can't wait.

I really should have used a fine hand rolled hem along that scalloped edge,  I was just hoping to get a crisp clean edge with the faced hem,  next time I'll clip the hem allowance and roll it in place along a pre-sewn guideline.  That should work much better.  However,  I think I'd still like to use the facing approach with the neckline because I really like how it "stands" on the neckline,  see below...  I just love that.


So today,  I'm going to hopefully continue work on the skirt portion of this outfit,  that is if I'm able to get a little time.  I've got to take my kids out again to the park,  can't miss that,  especially not on a day like this.


If you'd like to read more about fashion, information on the industry and online schools check out my site at:

If you're a designer or home sewer and you'd like to find some cool eco-friendly fabrics and more check out my resource page at:


Friday, May 11, 2012

Serious Progress on my Patternmaking Portfolio

I can't remember if I posted a link to my Patternmaking Portfolio I just put up a while ago,  if I didn't here it is: https://sites.google.com/site/ayisha1978designerpatternmaker/home/work-i-ve-completed-for-my-gracious-clients

Really though,  I should adjust the seo in that url.  The slideshow is a result of patterns I've drafted for another designer's collection.  I've got 3 collections of my own I should work on.  However,  for the moment I've been working on my first,  self designed portfolio piece,  the lemon tulip lingerie design.  Yesterday I was able to sew the skirt sections together,  using beautiful french seams,  and attached the hem facing to it's scalloped edge then clipped and understiched the seam.  Then I sewed the bodice sections together and pinned on the neckline facing.   Here are the pictures:

clipping the scalloped facing seam

right side of the skirt's scalloped edge

pin the corners of your scalloped facing to match correctly

didn't have the right pressing equipment to do a professional
job,  however, by using the tip of the iron and making tiny
pressing movements the resulting scallop edge turned out
very nicely

My first french seam,  such a beautiful seam,  it is time consuming
though, extra pressing is required and seam trimming.  One of my
books suggested to sew the first seam 1/4" press,  close and sew
it into another 1/4" seam,  this would have been messy though.  With
a little more research in two other sewing books,  you clip the seam
to 1/8" and then sew it into a 1/4" seam,  this is the correct way.


the completed skirt section,  ready for gathering
into the waist band

However,  as nice as the sewing is going,  I've discovered a 'lack of experience' issue with the drafting of the midriff area of the bodice,  it's got more ease than I meant for it to have.  Now I know a secret I have to learn more about (I actually love this kind of thing) Here it is:  

When you do a typical draft of a regular shoulder to waist pattern,  there's a little bit of ease at the waist unless you take it out and it will fit nicely.  But... if you draft a bodice pattern that reached down some where below the bustline, you'll discover that due to the inverse curve of the human body in that area,  there's quite a bit more ease than you'd like in a garment that supposed to be close fitting.   This is a very important detail to know,  especially if you want design or draft patterns for empire waist garments,  midriff designs or bras.   I probably would have learned this had I gotten my hands on the lingerie pattern drafting book I want to get.

Anyway,  my bodice ends just under the bust and I'm going to do a double check to see if I need to adjust the entire side seam or just the underbust edge. If so I'll determine the amount to take from each side seam at the underarms and then check how much more needs to be taken up at the midriff edge.  What ever needs to be taken up at the midriff,  I'm going to divide by 6,  with an amount taken up by each of the 4 darts (2 in the back and 2 in the front) and an amount at each side. (Mind you,  pattern wise, it'll look like I only took half the amount from the side seam).  

Then I'll have to adjust the midriff band accordingly as well as the bias cut tulip sleeves and take all the adjustments to my pattern in CorelDraw 9.  I'll complete that with some fitting notes for lingerie.  It will help to crystalize all the information. 

As for the skirt fit,  I'm pretty sure it'll be fitting like I want,  since it's at the waist and all,  I just hope it's going to have a bit of puff I was hoping for,  we'll see.

If you'd like to read more about fashion, information on the industry and online schools check out my site at:

If you're a designer or home sewer and you'd like to find some cool eco-friendly fabrics and more check out my resource page at: