Showing posts with label CorelDraw9. Show all posts

Sunday, November 25, 2012

Grading Shortcut For Patternmaker's Without Pattern Maker Software

Wow,  sorry there's often so much time between posts,  it's been a struggle between projects,  my kids devouring computer time and other responsibilities but,  I never forget about my patternmaker blog and while I get more experience in pattern cutting and grading I'm slowly coming across different shortcuts and techniques as well.

I haven't actually gotten around to doing any grading work on my sloper library lately,  but this weekend I figured out a way to grade both the front and back sloper sections simultaneously to save a bit of time.  This is how I managed it:

First you've got to slice your sloper sections up in the required areas,  then,  because the sliced portions of the front and back sections have to spread apart the same amount of distance all you really need to do is group together the corresponding vertical and horizontal portions and move them to where they need to be.   See below for an example:

Vertical Sections Selected For Spreading
Horizontal Sections Selected For Spreading
Now,  when your doing any kind of patternmaking work, grading or drafting,  you've got to always check things over,  your measurements of everything,  the 1/2" difference between the front and back sections and their armscye curve measurements,  then the sleeve curve ease and the shoulder notch.  All are small things,  but even in computer software,  if you're not using pattern maker software,  you could accidentally move something or even resize something and through off all your work.  

I spent the weekend tweeking my previous slopers to make sure measurements were in order,  no errors or anything that could pose a problem and then got started with grading my bodice sloper and it's sleeve up to size 12.   Yes,  I'm still working on grading up to Butterick size 24 so I can work with some online clothing companies I want to do business with.   I'm very excited getting my own patterns drafted finally.  But about doing business as a designer or patternmaker,  you've got to know what you're getting into and get ready for the long haul if you're not going to a complete, "you're going to learn everything" kind of fashion design course.  

First of all,  checking out my competition,  other patternmakers don't just have portfolios and years of awesome experience with designers everyone's heard about.   I've noticed patternmakers online offer a full range of services from pattern cutting,  grading,  sample making,  marker preparation,  spec sheets,  the works.  Basically, you want to have friends that do these things or you want to know how to do all of these things single handedly.  It's tough.  But,  don't shy away from it if this is what you want to do,  all I tell myself for example,  is that it's all a matter of reading a few more books and working on these skills.  That's pretty much all it takes.  Never let the time something may take deter you from learning how to do something you want to do, just do it.

As both a patternmaker and hopeful designer, while doing other people's patterns and eventually drafting my own patterns so I can get boutiques to sell my designs,  once the photos from their promotional campaigns start coming in,  I'll have my portfolio coming together without any extra cost and what could be cooler then that?  How long is this going to take??  Maybe another year or two I'm thinking,  but that's fine because it'll just get me more experience under my belt and I'll develop the confidence to take my endeavors to the next step like working for a company or a couple companies as a regular staff member or service provider.  :)  hehehe,  New York,  Paris,  Milan... Vancouver and Dubai here I come.

If you are interested in my discount digital pattern cutting or digitization service however,  or you have any questions,  please email me for more information at stylistwithacause@gmail.com or visit my Facebook page to learn more.

Friday, May 11, 2012

Serious Progress on my Patternmaking Portfolio

I can't remember if I posted a link to my Patternmaking Portfolio I just put up a while ago,  if I didn't here it is: https://sites.google.com/site/ayisha1978designerpatternmaker/home/work-i-ve-completed-for-my-gracious-clients

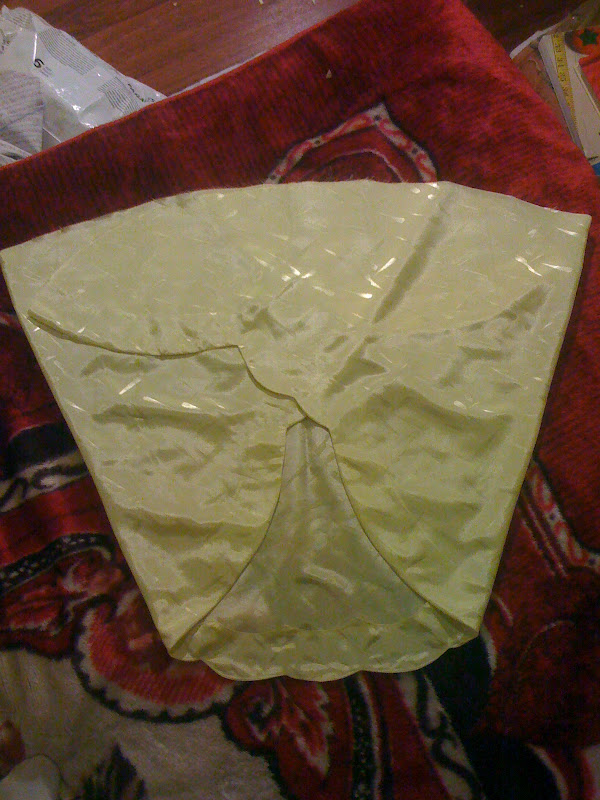
Really though,  I should adjust the seo in that url.  The slideshow is a result of patterns I've drafted for another designer's collection.  I've got 3 collections of my own I should work on.  However,  for the moment I've been working on my first,  self designed portfolio piece,  the lemon tulip lingerie design.  Yesterday I was able to sew the skirt sections together,  using beautiful french seams,  and attached the hem facing to it's scalloped edge then clipped and understiched the seam.  Then I sewed the bodice sections together and pinned on the neckline facing.   Here are the pictures:

clipping the scalloped facing seam

right side of the skirt's scalloped edge

pin the corners of your scalloped facing to match correctly

didn't have the right pressing equipment to do a professional
job,  however, by using the tip of the iron and making tiny
pressing movements the resulting scallop edge turned out
very nicely

My first french seam,  such a beautiful seam,  it is time consuming
though, extra pressing is required and seam trimming.  One of my
books suggested to sew the first seam 1/4" press,  close and sew
it into another 1/4" seam,  this would have been messy though.  With
a little more research in two other sewing books,  you clip the seam
to 1/8" and then sew it into a 1/4" seam,  this is the correct way.


the completed skirt section,  ready for gathering
into the waist band

However,  as nice as the sewing is going,  I've discovered a 'lack of experience' issue with the drafting of the midriff area of the bodice,  it's got more ease than I meant for it to have.  Now I know a secret I have to learn more about (I actually love this kind of thing) Here it is:  

When you do a typical draft of a regular shoulder to waist pattern,  there's a little bit of ease at the waist unless you take it out and it will fit nicely.  But... if you draft a bodice pattern that reached down some where below the bustline, you'll discover that due to the inverse curve of the human body in that area,  there's quite a bit more ease than you'd like in a garment that supposed to be close fitting.   This is a very important detail to know,  especially if you want design or draft patterns for empire waist garments,  midriff designs or bras.   I probably would have learned this had I gotten my hands on the lingerie pattern drafting book I want to get.

Anyway,  my bodice ends just under the bust and I'm going to do a double check to see if I need to adjust the entire side seam or just the underbust edge. If so I'll determine the amount to take from each side seam at the underarms and then check how much more needs to be taken up at the midriff edge.  What ever needs to be taken up at the midriff,  I'm going to divide by 6,  with an amount taken up by each of the 4 darts (2 in the back and 2 in the front) and an amount at each side. (Mind you,  pattern wise, it'll look like I only took half the amount from the side seam).  

Then I'll have to adjust the midriff band accordingly as well as the bias cut tulip sleeves and take all the adjustments to my pattern in CorelDraw 9.  I'll complete that with some fitting notes for lingerie.  It will help to crystalize all the information. 

As for the skirt fit,  I'm pretty sure it'll be fitting like I want,  since it's at the waist and all,  I just hope it's going to have a bit of puff I was hoping for,  we'll see.

If you'd like to read more about fashion, information on the industry and online schools check out my site at:

If you're a designer or home sewer and you'd like to find some cool eco-friendly fabrics and more check out my resource page at:


Thursday, April 12, 2012

The Patternmaker's Update: It's Been A Crazy Week

Okay,  so on our holiday weekend I'd planned to get my first portfolio piece completed,  I was raring to go and then I sat at the sewing machine to figure out stitch length and thread tension that would work for this beautiful but thin and slippery fabric I want to sew the lemon tulip lingerie pattern out of and...

The little rubber wheel that creates the traction necessary for new bobbin thread to be wound around a bobbin had melted into a gross black goo around the wheel it was supposed to be on.  And that wasn't all,  there was a piece of broken plastic from the socket that held the top thread spool,  so there was only one thing left to do. Open her up and see if I could fix the problem(s).  I'd found a crayon in the machine as well as the clip of marker top,  my daughter's doing for sure.

I've fixed a sewing machine I had before,  several times,  with success.   And I also repaired a scroll saw,  on my own,  again with success.  I took time and patients and all but I did it so I had no inhibitions about opening up this Brother sewing machine and seeing if I could get it up and running again.   Well after all was said and done, with an attempt to fit the wheel with a quintupled rubberband and then when I decided it wouldn't work because it was getting shredded,  I headed for the toy box in search of a little car.    Have you ever seen them? Little hard black rubber wheels,  they might have been just the thing I needed,  I did find one,  and I did fit 2 of the cars wheels on the bobbin mechanism,  but when I tried to run the machine, they too began to melt.  Yuck,  you know?   Okay,  so maybe the Brother company has the right wheel...I'll just have to email them,  I thought.

Then,  the needle bar somehow got misaligned too,  so that the needle completely missed the bobbin case.  No luck at all trying to figure that one out.  I did what I always do, compare adjacent pieces,  look for what looks like it's fitted wrong,  was there something sitting in the plastic case the wrong way?  Nothing made any sense.  Why did this time have to be a problem I couldn't fix?

WELL,  my husband came to my rescue and told me he'd get a new on for me on Monday,  which he did along with a new computer to replace this beat up HP laptop that's been giving me a hard time.   He's been watching me work on these computer patterns and get article projects done and realized I'm dead serious about what I'm into so he's offered his loving support and got me a beautiful new Singer sewing machine and a cool new Acer computer.

So I've been setting up the computer with all the programs and things I use to work and getting a new client's pattern completed (I actually just sent it off a few minutes ago).  It was my very first corset pattern for a designer in Saudi Arabia.  I hope they keep me on as a client.   It takes me a little longer to do work for a new client because I usually need to first prepare a brand new sloper for them from scratch,  they don't give me one.  I'm not sure why,  I guess they don't know about it.  I did hear that companies and designers are supposed to provide the patternmaker with the sloper in the size they want though.

Any while doing a bit of research this week also had me discover the reason behind the necessity of perfection in a patternmaker's work.   Thought it was just a pickiness thing?   Think again.  A person familiar with home sewing could easily make this mistake (I did for a while and I am a perfectionist) but the thing about homesewers,  as Kathleen Fasanella puts it, " homesewers expect too much from themselves"  they're highly skilled,  where as the people working in a factory are not and don't need to be.   This is why the pattern has to be perfect,  flawless without so much as a 1/32 of an inch mistake,  yes I'm not kidding you,  don't even allow yourself a 1/32 of an inch mistake.

Because,  the people working the factory sewing machines only have a small part of the garment to sew and they may not be aware how everything else is supposed to fit together they also won't know if something is a little off.  And the mistake will go from one person to the next,  no one knowing how to fix the problem, with chances being that the one mistake will cause additional mistakes and you'll end up with imperfect garments.   The horror.   And everyone will know it was your fault,  you are the one who made a mistake!

Any way,  how do you solve/prevent this problem all together, simple,  when you're working on the computer,  (God bless these things) set your nudge distance to 0.031 (this is the 1/32" I was talking about)  and work under a microscope,  in CorelDraw 9 for example,  this means zooming in till 1" is about 5" or 6" on the screen.  Make sure all your points,  lines and curves match up everywhere under this "microscope" and remind yourself that this attention to detail is what will set you apart from the rest.

And just for the sake of reference,  should any of you be using CorelDraw 9 to draft patterns,  like myself,  when you've powerclipped something into a 'container' to be able to cut it up into separate,  perfect panels,  make sure your cutting path ( this can be a straight or shaped line) isn't closed.  If it is a closed path for some reason the interior of this path gets rid of the pattern piece you're trying to slice through.

Okay,  so now I've got another dress pattern to do for my client in New York and I have to watch the dvd that came with the Singer sewing machine so I can start sewing with it fairly quick.  Maybe this weekend,  I'm hoping,  unless something else comes up.   But my deadline is either by the end of this month of April,  or at the very least the first week or two of May.


If you'd like to read more about fashion, information on the industry and online schools check out my site at:

If you're a designer or home sewer and you'd like to find some cool eco-friendly fabrics and more check out my resource page at:

Tuesday, January 31, 2012

Patternmaking In CorelDraw9

Wow,  once you know how to use a software and you have a skill you can implement iton it,  like patternmaking things can get really cool.   With the precision of a software like CorelDraw9 program your confidense goes up and because you don't have to worry about wasting any fabric or paper you're ready to edit anything over and over again,  save all your 'work in progress' steps as valuable resources and above all experiment.   I grade my patterns,  I build the seams,  add the allocations and pattern markings,  use slash and spread techniques and dart piviting as well as create and edit style lines all in one place.   The only problem is that I couldn't measure curves.  

This becomes a problem any time I had to true up the armcye and/or a sleeve cap.   Before today I was printing out sections of my patterns and reprinting them from AdobePhotoshop CS2 whenever I had to walk the sleeves into their armholes and adjust their curves as needed because there was no way for me to perfectly measure them.   Truly a nuisance.   So I decided to look for how to measure curves in CorelDraw9 on Google.  

I stumbled upon a forum where some guy who happened to be a CorelDraw user that developed a script for doing just that.   Cool little thing too.   Any way here's the full lowdown for any of you who may need such a curve measuring script:

(Thank you Peter Clifton of the UK,  for putting out this free to download and edit script,  God bless you big time)

First download the curve measuring script for your version of CorelDraw9 from Peter Clifton's page: http://www.clifton89.freeserve.co.uk/

Then follow the instructions about how to incorporate the file into your CorelDraw9 subdirectory (folder group in programs on your computer) Scroll down to the bottom of this page:
http://www.oberonplace.com/draw/drawscripts/megagallery/index.htm

And all this has got me to thinking about my own designs too.   When I've completed patterns for my clients and I have a little extra free time,  I could develop my patterns,  say in a size 6 like my dressform and either sell them to home sewers who like my designs or sell them to clothing manufacturers who like them.  Of course this means I'd most likely lose re-sale and distribution rights,  but I won't mind that at all if I can get credit for my designs (not at all like when you work as ghost writer).

At this point,  I have no idea what next time's post will be about,  but it'll definitely be something cool about patternmaking or fashion design.   I thank God for all the people out there that put together free information,  programs and scripts for those who need them.

If you'd like to read more about fashion, information on the industry and online schools check out my site at:
Budget Online Fashion Design Schools and Resources

If you're a designer or home sewer and you'd like to find some cool eco-friendly fabrics and more check out my resource page at:
The Eco-Friendly Fashion Designer's Resource Page

Thursday, January 26, 2012

New Clients And How To Plan Out Your Digital Patternmaking Process

People are still contacting me about my patternmaking services even though I haven't refreshed my add since the first time I posted it.   I do wish communication with people who contact me was consistent.   Things happen though,  one lady has had an unexpected tragedy in her family,  this is usually a time consuming disaster in anyone's life,  however,  I think some people just starting out can get easily side tracked,  like one fella I was talking to,  that reminds me,  I should email him again see what happened to him.  

Never be afraid or put off emailing people,  it's how to stay in touch.   Don't always assume that people have changed their mind about you,  it's just that there's so many things to do in work and life that if your services aren't needed "right now" than you may not hear from them in a while.  However,  this can put you at risk of being forgotten or shied away from.   People will be like,  "Gee, maybe she's forgotten about me and maybe I better contact someone else because she's probably gotten real busy,  it's not like she's contacted me recently"  You know what I mean?

So contact your contacts, hehehe,  it won't hurt and they won't bite.   I'm going to contact that guy right now... be right back.

Done.   And they got back to me already too,  so cool,  you got to love clients who are that fast :)  .   So here it is,  the fella I was talking about is just taking care of all the necessary prep work, he's got 3 shows coming up all in one month and one of my lady clients is going to send me a payment for some work I've done already.

Now for the Digital Patternmaking Process:  

As I've done this several times already,  I've worked out a step by step system for setting up and completing a digital pattern in the most efficient and time effective way,  here it is:

1.  pick out your sloper in the right size and type

2.  don't get rid of anything in your pattern vector doc,  you may need it for reference,  alterations or even another pattern so keep everything and copy everything too

3.  copy your sloper into the new garment pattern file making sure that front and back side seams have been aligned perfectly then separate a copy of them on a separate page (within the same vector file) but keep them on the same level (waist and bust lines are aligned across the page)  this will help you keep your pattern drafting in correct orientation.

4.  do your garment shells first

5.  have a copy of all the necessary pattern markings you'll need ready on the outside of your pattern's vector page

6.  group front and back pattern blocks then place them one on t0p the other with side seams matching

7.  true up your pattern blocks and place your pattern markings

8.  plan out your facings/interfacings

9.  mark them accordingly

10. create your seams,  plackets and hems

11.  make as many copies of these front and back sandwiched blocks as other pattern pieces you'll be needing,  for example if you need armscye,  front and back facings,  make a copy of the block 'sandwich' for each separate piece

12.  ungroup the pattern block sandwiches and delete each unnecessary piece till you have each pattern piece you need from each group of front and back pattern block 'sandwiches'

13.  group each new piece with their own separate pattern markings

14.  arrange in order on the page,  save again (do this often,  make it almost like breathing)

15.  export a copy as a jpeg and send it to your client and another one to yourself preferably in gmail should anything happen to your computer you'll still have your work in an email account that won't get rid of it

In my next blog post I hope to have a few pictures of my "lemon tulip lingerie" number as I'm almost done with the pattern.  Just have to do those pretty little tulip sleeves.   Slow going only because I've also been working on my clients projects.   I'll have it completed before long though,  no worries.


If you'd like to check out my fashion or eco friendly fashion resources lenses here are their links, feel free to drop me a note if you like what you see/read, I'll be happy to hear from you:
The Eco-Friendly Fashion Designer's Resource Page


Tuesday, January 17, 2012

Patternmaking Progress Benefits Of Going Both Manual And Digital

If you're a manual patternmaker,  meaning you draft your patterns entirely on paper,  that's great,  keep doing it,  but you may also want to consider adding digital patternmaking to your capabilities as you'll enter a whole new world of perfection and precision.   Sound good?   It is.   There are a few different ways of handling digital patternmaking if you aren't using patternmaking software and are simply using a vector program.  

Why vector?   Because it's easier to edit and move your lines,  alter sizes and access seperate layers of your work without a hassle and your work taking a serious degradation hit as it will get if you use a bitmap editing program (Adobe Photoshop,  PaintShopPro,  etc)  so I use CorelDraw9.

Another way cool thing about Using CorelDraw is changing the colors of your objects/layers is as simple as a click of a button.   As for actual hands on measurements though,  (I think this is probably the plus size that one may  find with patternmaking software) CorelDraw doesn't allow you to measure curves,  which is a nuisance,  however,  I just make a jpeg export file of my selected curve or pattern section, open it up in Adobe Photoshop and print it off to take the measurements.   Then I'll make the necessary adjustments and repeat the proces till those curves are what they got to be.

I love manual pattern drafting,  but it takes up the kitchen table all day and all night and that's a problem.   Also,  if you make an error, the whole pattern has to be done again rather than just a few lines having to be made or a copy of the original file needing to be tweeked.  A lot easier to handle there,  even if the experience isn't quite as much fun as traditional pattern drafting,  you're still getting the job done especially if you're working from a drape you scanned into the computer because that's what I've been doing.

Just wish I had a model or a professional dressform with an arm attachment so I could do drapes of different sizes and properly check my sleeve draft. 

My New York client wants to have a few samples produced before I begin the rest of the collection so I might have a day or two to work on my own portfolio pieces till I start back again.   Once I get going on my portfolio pieces it'll also be some of the best patternmaking practice I've done because I'll get hands on,  full,  all around effort and results from draft to finished garment.   This is something I can't do so well with my clients work because I'll never get to see the first sewn samples so I can't experience the purpose behind the adjustments that may need to be made. 

With my own patterns though,  I'll be able to tweek my pattern drafts to perfection and learn a lot of patternmaking secrets in the process.

I had a great idea last night though,  I'm going to see if I can rent different size dressforms,  or go somewhere to get access to them so I can drape different size bodice slopers.  That would be so,  so awesome if I could do that.   That way I'd have a sloper size for every client's needs.   Welll a lot of clients needs anyway,  without having to guess whether or not I'm doing it right.   If I can do that,  I'll also look into getting some knit fabric so I can finally make my knit slopers.   You see if I can do that,  I won't actually have to invest a whole bunch of money into multiple dressforms or an adjustable one because I'll have those foundation slopers to make everything from.   Unless of course I get into some serious draping.   Then I'll still have a problem.   I'm going to look into that today.   There's a sewing shop nearby so I'm going to give them a call later. 

As for working with clients,  I stumbled upon a great resource a while back that was meant for the designer or company wanting to learn how to hire a patternmaker.  I feel this 8 page e-book is very important for a patternmaker to read as well,  just so he or she will also learn how they need to professionalize and perfect themselves (or rather,  their work,  I know,  you're probably feeling "but I am my work :)  ,  hehehe)  and what to expect from your employer/client.   This is so helpful.   It may be a little scary,  daunting to live up too,  but knowing what's expected of you and taking the guess work out of what you need to know is great for getting a real handle of control over your efforts and focus.   In the end,  when you put in the time to perfect everything,  it's empowering and well worth the extra effort.   So if you have enough courage and faith in yourself to go the route,  here's the link:
http://designer-entrepreneurs.com/hire.htm

If you'd like to check out my fashion or eco friendly fashion resources lenses here are their links, feel free to drop me a note if you like what you see/read, I'll be happy to hear from you:
The Eco-Friendly Fashion Designer's Resource Page


Tuesday, January 10, 2012

Scary Sloper Issues And Patternmaking Problems (Solved)


Last week I got a client who wanted me to start work as soon as possible.   I started checking out my size six sloper so I could grade it down to a size 4 only to discover that the front and back blocks were not drafted correctly.   They just sit well at all on the dress form,  complete with gaping around the armscye, centre bust  and lop-sided waitstline.   After having followed all the instructions I actually emailled Connie Amaden Crawford to see if she could help me figure out what went wrong.   This wasn't the first time either,  she's a wonderful help when I ask her for patternmaking advice.   She got back to me the same day and it was a Sunday!

First of all my dressform is a home sewer's dress form,  it's an okay tool,  but according to Connie because of it's imperfections ( such as having caps at the armscye position instead of being flat) it can cause problems.   Which brings me back to something I said before,  it's a good idea to try and invest in professional tools.   However this didn't bring me to the point of giving up.  the dress form is shaped like a human being,  so it's got to be some use even if there aren't any of the special aids to help me get the drape right and so on.  

Connie assured me that beginners always stretch their drape,  so this second time around,  I very carefully handled my fabric  with the gentlest touch possible,  following the steps one by one, not skipping anything and not doing a later step before it's time.  For example, in the book "Pattern Making Made Easy"  Connie states that you need to pinch the darts from the apex (the bust point) I didn't do this with my first drape.   This creates the problem of a twisted and incorrect dart where as a dart pinched from the apex will lie smoothly and be easily pivoted in the right position later on (in your paper draft) if you want to move it.

So I fixed up the drape,  traced it on 3 sheets of paper,  back block on top of the front block so that side seams would automatically match :),  nice little trick there I tell you.  Then after a bit of  tweeking and experimenting I adjusted the armscye,  got rid of the gaping,  eliminated unwanted ease and my beautiful sloper pictured above was the result:

This didn't come easy though,  this is making a terribly long story of trial and error short.   I did several failed pin fittings with paper re-visions of my slopers,  I was disheartened and tired too.  Making matters worse,  my later experimental adjustments to the sloper in CorelDraw9 were worse than the first few attempts.  I was clearly going in the wrong direction (you can do this when you're tired) so it finally dawned on me that maybe the real problem was that I was checking the paper fit and not a fabric one.  You can see those below,  they're stiff but they're still kind of neat.   Lol,  when  I sewed up my sloper in a nice hand of fabric (pictured above) it fit like a glove,  a thing of beauty.


If you'd like to check out my fashion or eco friendly fashion resources lenses here are their links, feel free to drop me a note if you like what you see/read, I'll be happy to hear from you:
The Eco-Friendly Fashion Designer's Resource Page

Wednesday, January 4, 2012

The Benefit Of Printing Out Your Digital Patternmaking Trial

Previously,  I used an old piece of flannel to drape a bodice sloper onto my dressform,  hehehe,  nice try,  it was,  I liked it because it turned out pretty well,  or so I thought.  So I've drafted up all my basic slopers,  all of them.  Then,  more recently because my patternmaking study and hands on practice went so well in developing my understanding that I decided to take the plunge and try my hand at digital pattern drafting in CorelDraw 9 and then use Adobe Photoshop CS2 to create printable files from my CorelDraw pattern.

Well,  I had a bit of a pause in my progress from then because I've had to work on a writing assignment but last night I hurried up (at 11pm) and put together my print out jpeg files (that is divided my digital patternmaking exercise into printable size documents,  printed them and then taped them together) and put the front and back bodice patterns together.   Trued them up,  perfect of course except some adjustment to the armscye curves,  but I was expecting to have to do as much.   Any way though,  when I compared them to my manual,  original,  non-digitally drafted patterns I realized there was a problem.

Okay,  so I took my print quality paper (this white stuff is not as soft as the packaging paper) and sized it up against the dressform and discovered something very valuable... the benefit of 'fitting' a paper pattern to the dress form lies in the paper's inability to stretch.  

This was an 'ah ha' moment for me. 

Originally I was a bit frustrated with how the armscye on my original bodice sloper that I'd sewn from the first paper pattern draft,  seemed to not hang comfortabley on the dressform and the reason I think,  is that the height level of the front and back shoulders on the pattern draft ended up being just a bit shorter then they were supposed to be and at a slightly wrong angle as well.  

The reason this happened was because the fabric that I used to drape on my dress form must have stretched a bit while I was draping it.  So now I realize that a draped pattern must be tried,  sewn,  fitted than compared to a "fitted" non-stretchy digital paper pattern and not just given the "Okay" when the first fabric sloper seems to sit well.

What a relief to find that out.  So I'm going to hurry up and fix that later on today hopefully,  before my client sends some work my way.  I want my work to be perfect,  totally perfect.   So what I'm going to do,  is make the adjustments to the digital pattern,  make a set of print outs, put it together,  cut it out of some fabric,  sew it together and check it again.  I can't wait to see if the armscye issue will be corrected,  I'm thinking it will be and I'll be happier with the fit.  I think I'm going to find a better piece of fabric to work with though,  one with a tighter weave this time around.   And next time I want to post some pictures too.   My brother gave me his iPhone and the camera on it is better than the one on my cell phone (yeahhhh).

If you'd like to check out my fashion or eco friendly fashion resources lenses here are their links, feel free to drop me a note if you like what you see/read, I'll be happy to hear from you:

Thursday, December 29, 2011

Free Fashion Figure Template Downloads/Printing How To

Well okay,  about a week ago,  I posted my free fashion figure templates for everyone to download or print,  which ever you like and my instructions for how to get the files into your hands were... a little off.   Google's way of allowing people to view them has changed so this is why I made the mistake in the first place.   So here's the right way to do it and the link to the post so you don't have to look for it if you want to go back and get some fashion figure templates to start working on your own fashion designs after you read this post:

http://myroadtobecomingafashiondesigne.blogspot.com/2011/12/free-fashion-figure-templates-are-here.html

1.  when you see a template you like in the 'free fashion figure templates' blog post left click on the picture

2.  when the 'gallery view' comes up and there's a row of thumbnails at the bottom of the screen with the larger image you chose at the top right click on the big image and click the option that says "open in new tab"

3.  when you're in the new tab you'll see the template on a white background,  run your mouse over it (it'll probably appear as a zoom lens

4.  click to zoom to actual size and print the image out, depending on what size you want the figure to be you may want to save the image and change the size (and eliminate the problem of having the url printed with it at the bottom of the page) or you might just want to take the shortcut and pick the "fit to media" option in your printing dialogue box.

Okay so there you go,  sorry if you had any problems getting these images printed out the first time around.   I might take a while to get my actual patterns made for my portfolio designs,  although they are definitely going to happen (I've already got several design illustrations thought up and ready to scan in and edit),  because I'm also teaching myself how to create digital patterns using CorelDraw9 and Adobe CS2.   It's a must that I learn this because I realize it's the best thing for both my potential clients and myself to do so and it's in demand.   I'll keep you all posted as things progress though.

If you'd like to check out my fashion or eco friendly fashion resources lenses here are their links, feel free to drop me a note if you like what you see/read, I'll be happy to hear from you:

Budget Online Fashion Design Schools and Resources

The Eco-Friendly Fashion Designer's Resource Page